STATSRAAD LEHMKUHL - Ein Niet, welcher hält, wenn man es richtig macht! (DE/EN)
Das Nieten von Stahlplatten (see English text below)
Zur allgemeinen Einordnung: Das Niet und die dazugehörige Verarbeitungstechnik unterteilt sich in
- Vollnieten – findet heute noch im Flugzeugbau statt, früher auch im Schiffbau
- Hohlnieten – kennen wir z.B. von Kleidungsstücken wie Jeans
- Blindnieten – auch Popnieten genannt, kennt jeder Hobbybastler
- Stanznieten – wird in der Massenproduktion eingesetzt
Im Folgenden betrachte ich nur das Vollnieten. Diese Technik ist die älteste und, was die Begutachtung der Qualität der Nietverbindung angeht, die einfachste und mit bloßem Auge zu betrachten (Im Schweißverfahren geht das nur mit Röntgentechnik). Hätte man bei der Boeing 737 MAX, der kürzlich ein Element der Außenhaut weggeflogen ist, genauer hingesehen, hätte man die unzureichende Nietverbindung (Material lag nicht bündig und fest gemäß Spezifikation an) entdeckt und wäre es nicht zu dem Unfall gekommen.
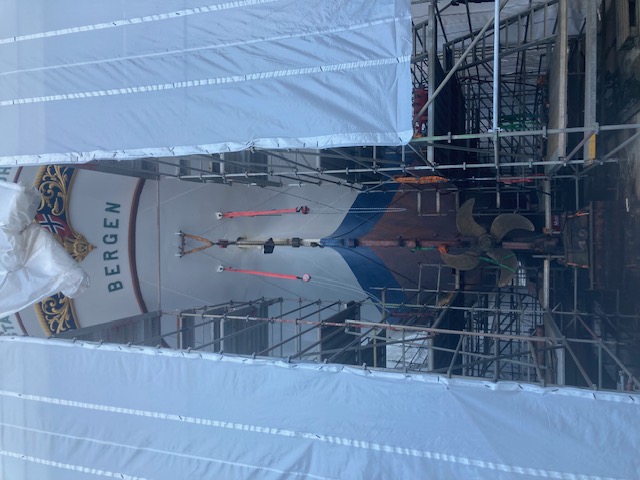
Hier ein Foto von achtern mit demontiertem Ruder. - Here is a photo from aft with the rudder removed.
Im Stahlbau (Schiffe und Trägerverbindungen wie z.B. Brückenkonstruktionen) wird heute nur noch geschweißt. Jedoch gibt es noch viele Eisenbahnbrücken aus dem 19. und der ersten Hälfte des 20. Jahrhundert in Vollniettechnik. Hier wird bei Reparaturen vorrangig wieder genietet, wofür es nur noch wenige Fachleute gibt. Im Schiffbau wird jedoch eine genietete Außenhaut- oder Decksplatte geschweißt, wenn diese ersetzt werden muß. So geschehen auf allen alten Windjammern wie SEDOV, KRUZENSHTERN oder auch die Museumsschiffe PEKING und GORCH FOCK I.
Nicht so bei der norwegischen STATSRAAD LEHMKUHL, die am 14. Januar 110 Jahre alt wurde. Das Schulschiff lief 1914 auf der Tecklenborg-Werft in Geestemünde vom Stapel, natürlich genietet. Heute ist die Bark fitter denn je, denn sie wird vom Eigner, der Stiftelsen Seilskipet Statsraad Lehmkuhl ständig in Stand gehalten und technologisch aktualisiert. Aber, was das Äußere angeht, soll der schmucke Segler noch immer so aussehen, wie bei der Inbetriebnahme 1914 (jetzt zusätzlich mit den vorgeschriebenen Rettungsbooten und der Radar-/Antennentechnik). Dazu gehört auch, dass Rumpfplatten, die ersetzt werden müssen, wieder genietet werden.
Die folgende Bildsequenz zeigt den erforderlichen Ablauf, nicht in jedem Detail, aber doch so, dass die Arbeitsgänge erkennbar sind.
Werftarbeit Oktober 2023 bis 2. KW 2024 - Fotos von Chief Engineer Jonas Jensen!
The riveting of steel plates
General classification: The rivet and the associated processing technology are divided into
- Solid riveting - still used today in aircraft construction, previously also in shipbuilding
- Hollow rivets - familiar from items of clothing such as jeans
- Blind rivets - also called pop rivets, known to every hobbyist
- Self-pierce riveting - used in mass production
In the following I will only look at solid riveting. This technique is the oldest and, as far as assessing the quality of the riveted joint is concerned, the simplest and can be seen with the naked eye (in the welding process, this is only possible with X-ray technology). If the Boeing 737 MAX, which recently had an element of the outer skin blown off, had been inspected more closely, the inadequate riveted joint (material was not flush and tight according to specification) would have been discovered and the accident would not have occurred.
In steel construction (ships and beam connections such as bridge structures), only welding is used today. However, there are still many railway bridges from the 19th and the first half of the 20th century that use the full rivet technique. Here, riveting is once again the preferred method for repairs, for which there are only a few specialists left. In shipbuilding, however, a riveted outer skin or deck plate is welded when it needs to be replaced. This is what happened on all the old windjammers such as SEDOV, KRUZENSHTERN or the museum ships PEKING and GORCH FOCK I.
Not so with the Norwegian STATSRAAD LEHMKUHL, which turned 110 years old on 14 January. The training ship was launched in 1914 at the Tecklenborg shipyard in Geestemünde, riveted of course. Today, the barque is fitter than ever, as it is constantly maintained and technologically updated by its owner, Stiftelsen Seilskipet Statsraad Lehmkuhl. But as far as the exterior is concerned, the smart sailing ship is still intended to look as it did when it was commissioned in 1914 (except for nowadays required lifeboats and radar/antenna technology). This also means that hull plates that need to be replaced will be riveted again.
The following sequence of images shows the necessary process, not in every detail, but in such a way that the work steps are recognisable.
Shipyard work October 2023 to 2nd week 2024 - Photos by Chief Engineer Jonas Jensen!
Abb./Fig. 1 - Unterwasserschiff im Bereich der Wrangen ... Underwater hull in the area of the wreaths
Abb./Fig. 1
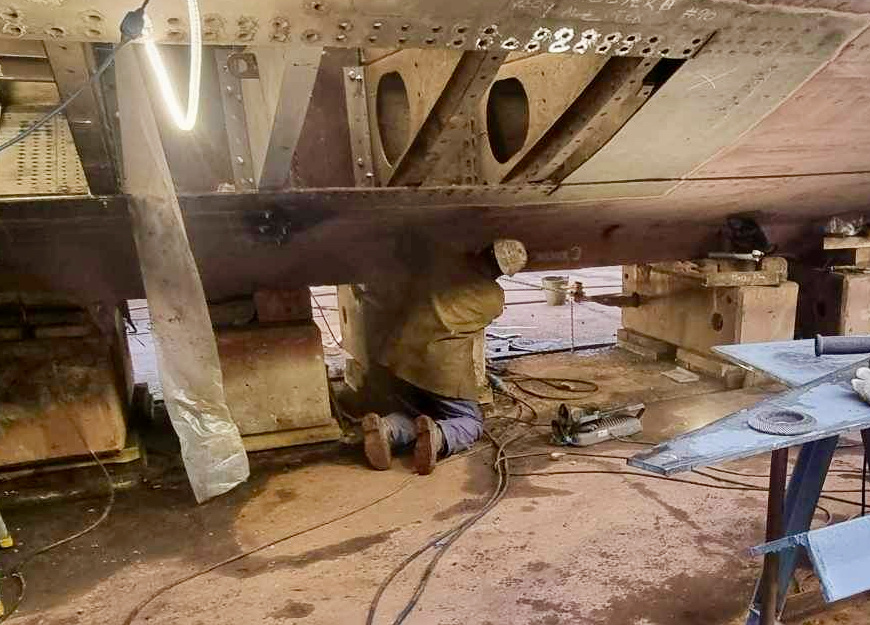
Als erstes muss die zu ersetzende Stahlplatte sauber von den Spanten und Nachbarplatten herausgetrennt werden. Das Bedarf viel Umsicht, damit die Struktur nicht beschädigt wird. An Stellen, an denen keine Nieten sich befinden, muss mit dem Schneidbrenner getrennt bzw. geflext und später geschweißt werden.
First of all, the steel panels to be replaced must be cut cleanly away from the frames and neighbouring plates. This requires great care so that the structure is not damaged. In places where there are no rivets, they must be cut with a cutting torch or tanged and later welded.
Abb./Fig. 2 - Platte geschnitten und gebohrt ... Panel cut and drilled
Abb./Fig. 2 & 3
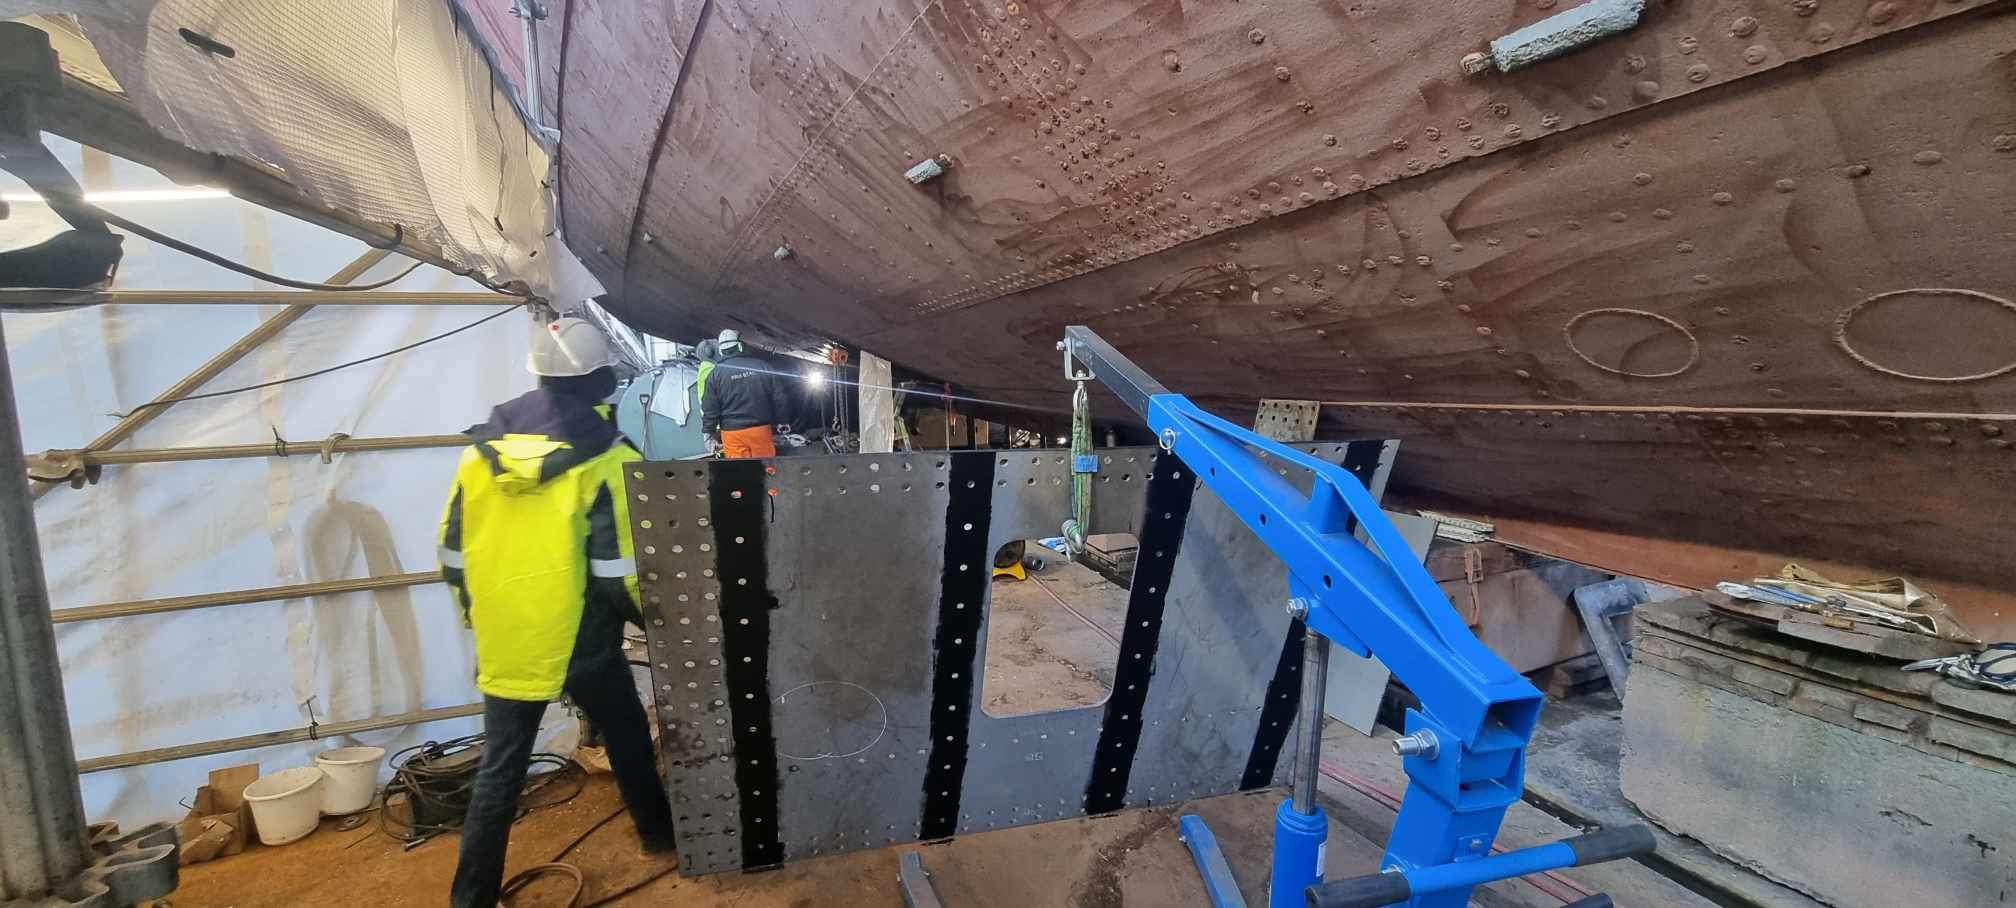
Dann werden die neuen Schiffbauplatten in der gleichen Stärke ausgemessen, zugeschnitten und die Löcher nach dem Originalstück, das herausgetrennt wurde, gebohrt. Die Löcher sind im Durchmesser etwas kleiner als die Nieten. Die Passung wird erst nach der Vormontage mit den Spanten/Nachbarplatten hergestellt.
The new shipbuilding panels are then measured to the same thickness, cut to size and the holes drilled according to the original piece that was cut out. The holes are slightly smaller in diameter than the rivets. The fit is only created after pre-assembly with the frames/adjacent plates.

Abb./Fig. 3 - Vor der Montage mit aufgeschweißten Spannösen ... Before mounting with welded-on clamping lugs
Abb./Fig. 4
Die Platten werden mit Schrauben und Muttern am Rumpf vormontiert (an Spanten und/oder Nachbarplatten). Dabei legt sich die ursprünglich gerade Platte an die Außenkontur an und wird vorgespannt. Das geschieht von innen durch aufgeschweißte Spannlaschen. Damit legt man die Platte an die umliegende Kontur fest an.
The steel plates are pre-assembled on the fuselage with nuts and bolts (on frames and/or neighbouring plates). In the process, the originally straight plate is positioned against the outer contour and pre-tensioned. This is done from the inside using welded-on clamping straps. This ensures that the panel is firmly attached to the surrounding contour.
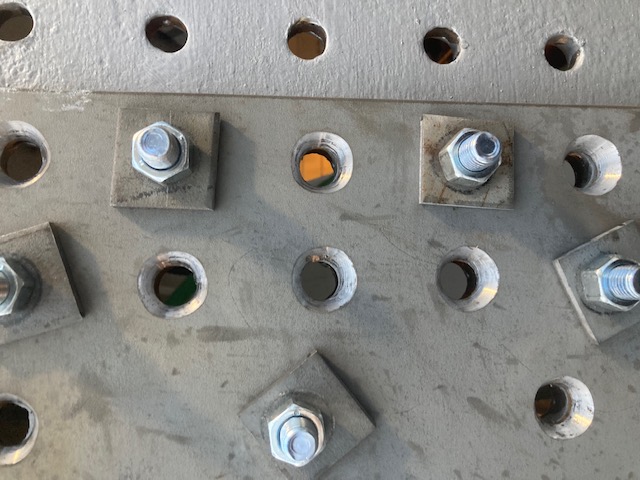
Abb./Fig. 5 - Nietlöcher nachgerieben und konisch gesenkt ... Rivet holes reamed and countersunk
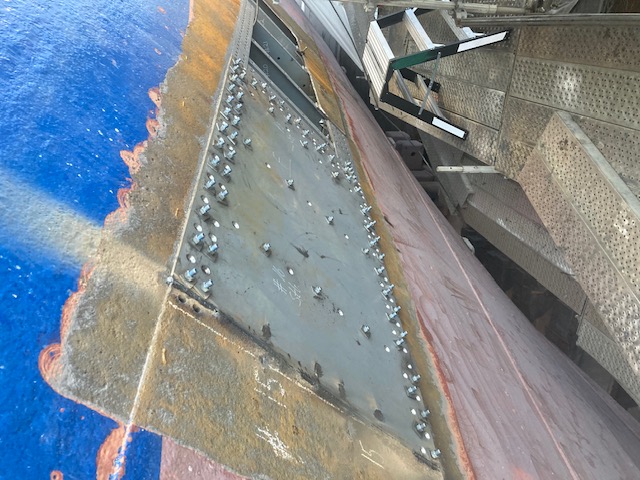
Abb./Fig. 4 - Vormontierte Platte mit Schrauben befestigt ... Pre-assembled panel fixed with screws
Abb./Fig. 5
Die Löcher der beiden Platten, die vernietet werden, sollten deckungsgleich sein, was sie aber selten zu 100% sind. Mit einem Reibwerkzeug werden alle Löcher nachgebohrt, so dass alle Nieten passen. Von der Außenseite werden dann die Nietlöcher konisch mit 45° angesenkt.
The holes of the two panels that are riveted together should be congruent, but this is rarely the case 100% of the time. All holes are re-drilled with a reaming tool so that all rivets fit. The rivet holes are then countersunk conically at 45° from the outside.
Abb./Fig. 6 & 7
Im Innenraum des Schiffes wird nach und nach ein Niet im gasbetriebenen Ofen auf Schmiedetemperatur (ca. 700°C) erhitzt und mit einer Zange in das jeweilige Loch von innen eingeführt.
Inside the ship, a rivet is gradually heated to forging temperature (approx. 700°C) in a gas-fuelled furnace and inserted into the respective hole from the inside using tongs.
Abb./Fig. 8 & 9
Dann kommt der Gegenhalter zum Einsatz, damit sofort von außen der Niet mit einem pneumatischen Hammer vollständig in das vorgesenkte Loch eingetrieben werden kann.
The counterholder is then used so that the rivet can be driven fully into the countersunk hole immediately from the outside using a pneumatic hammer.
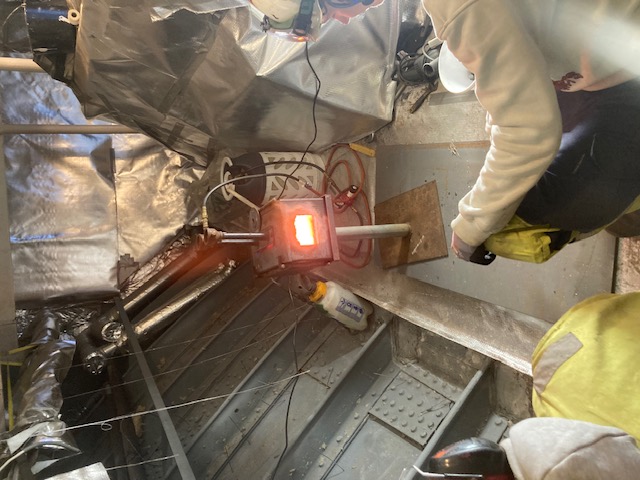
Abb./Fig. 6 - Erhitzen des Niet auf Schmiedetemperatur ... Heating the rivet to forging temperature
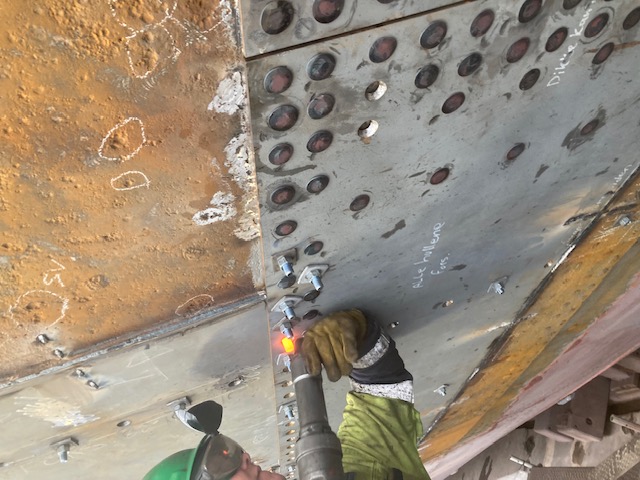
Abb./Fig. 8 - Der Niethammer wird angesetzt ... The riveting hammer is set in place
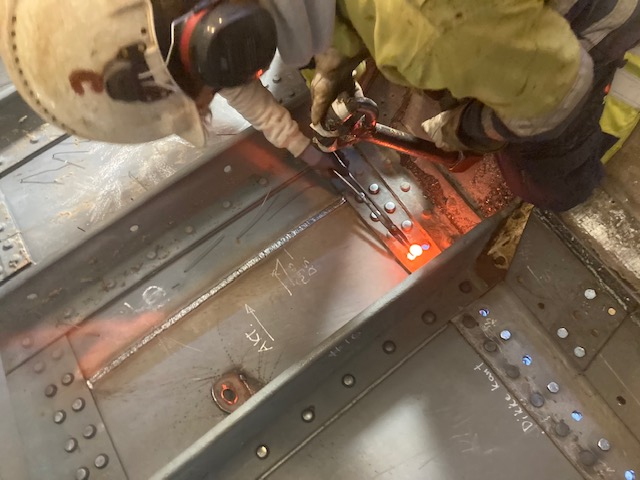
Abb./Fig. 7 - Schnell ins Nietloch ... Quick into the rivet hole
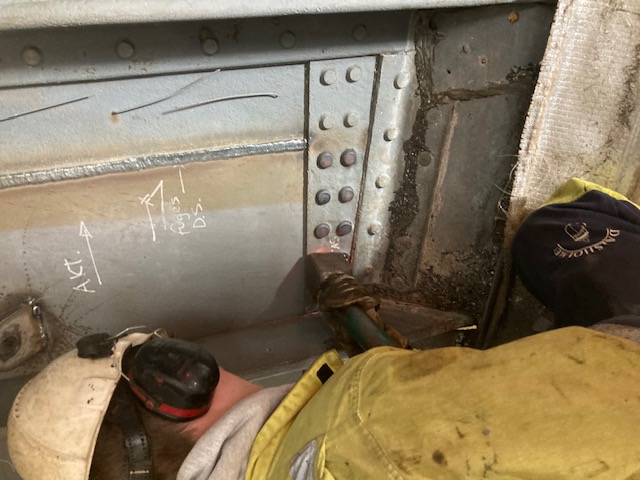
Abb./Fig. 9 - Von innen der Gegenhalter mit Gewicht ... From inside the counterholder with weight
Abb./Fig. 10
Zunächst wird das Niet gestaucht und legt sich an die Bohrungswand an. Dann wird das noch glühende Material in die Einsenkung des Loches getrieben. Zum Schluss wird der Nietkopf flach auf die Platte getrieben und zieht beim Erkalten die Platten zusammen.
Firstly, the rivet is compressed and is positioned against the wall of the hole. Then the still glowing material is driven into the countersink of the hole. Finally, the rivet head is driven flat onto the steel plate and pulls the plates together as it cools.
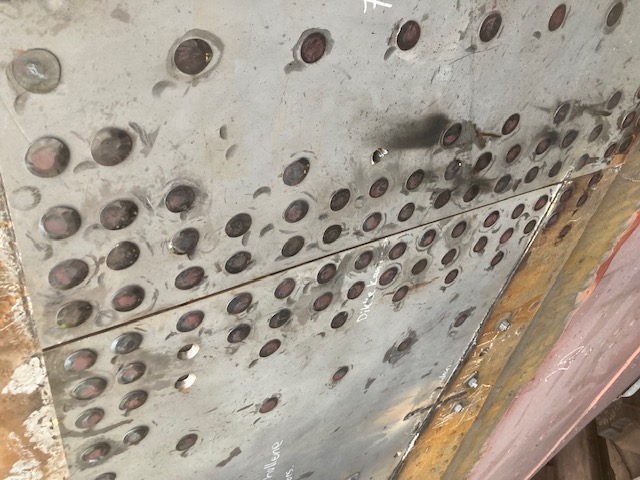
Abb./Fig. 11 - Die neue, genietete Stahlplatte mit gerundetem Nietkopf ... The new, riveted steel plate with rounded rivet head
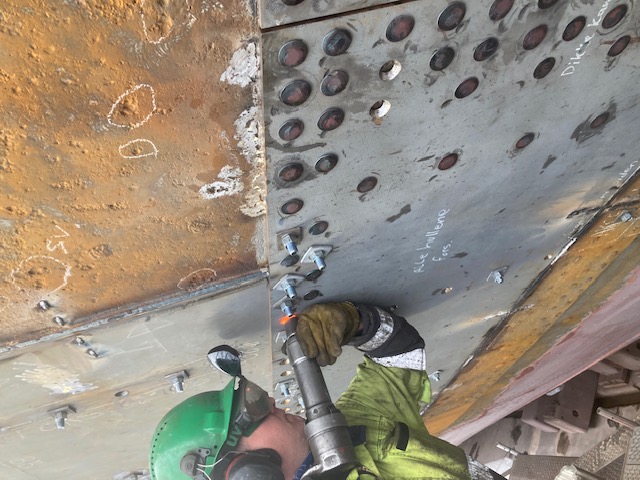
Abb./Fig. 10 - Der Niet wird in die Bohrung gepresst und platt geschmiedet ... The rivet is pressed into the hole and forged flat
Abb./Fig. 11
Das Niet bekommt einen leicht gewölbten Kopf indem man wartet, bis das Niet etwas erkaltet ist. Dann treibt man mit dem Hammer nochmal den Niet, um einen optisch schönen Kopf zu erzeugen, auch um die Ränder vom Nietkopf fest auf die Platten zu drücken.
The rivet is given a slightly curved head by waiting until the rivet has cooled slightly. Then drive the rivet again with a hammer to create a visually attractive head and to press the edges of the rivet head firmly onto the plates.

